Guide: your own station
From the SDR at the dish to the control page: set up the gateway, pair it with your account, listen and, with permission, transmit.
This version takes you as far as listening: gateway onto the board, autostart, pairing with your account, LNB and beacon setup, then tuning in the browser. The control page comes straight from the gateway: at home on the station network without afu.tools and without internet; when you're away, you operate via afu.tools. Transmitting follows as soon as the gateway ships it. You can already build and flash the power amplifier controller. To see what the control page looks like beforehand, try the demo.
Setup
Gateway onto the board, start it at power-on and link it to your account.
Requirements · Download and install the gateway · Autostart · Pair with afu.tools
Requirements
Supported hardware, SDR firmware version, network and account.
The gateway is a single program that runs on the SDR board itself. It captures the whole NB transponder, computes spectrum, waterfall and audio, and sends only that to the browser. You don't install anything on your computer; for setup you need one SSH session.
SDR board
The supported board is the LibreSDR (Zynq 7020 with AD9361 or AD9363, 1 GB RAM, gigabit Ethernet). Dealers also sell it as "Pluto+". An ADALM-Pluto is not approved.
The microSD card must hold the firmware Tezuka v0.3.12 in the tezuka-libre variant. The gateway has been tested with this version. With another version it receives, but it only transmits after you approve it (see Updating Tezuka). The file is called tezuka-libre-v0.3.12-730087d.zip and is available from the Tezuka releases on GitHub. Copy the contents of the sdimg folder from the ZIP straight to the top level of a FAT32-formatted microSD card and insert it. Windows only offers FAT32 for cards up to 32 GB, so the easiest option is to use one of those. If you don't know which firmware is currently on your card, reflash v0.3.12 this way.
The LibreSDR only boots from the SD card. The .frm files in the ZIP and the update via the board's USB drive write to memory it never boots from. At best nothing happens, at worst it causes confusion on your next attempt. Always change firmware via the card.
Receive path
Dish, LNB for 10 GHz and a power supply for the LNB, plus a coax cable to the board. The LNB converts the downlink to an intermediate frequency; with a 9750 MHz oscillator the beacon is at 739.750 MHz. The cable goes to the RX1 port of the LibreSDR. The supply voltage usually reaches the cable through a bias tee: it has one port to the LNB, one for the power supply and one to the receiver. No DC must come out of the receiver port, because the SDR input can't take it. If you're not sure about your bias tee, put a DC block between it and RX1, a small adapter that only lets the RF signal through.
Align the dish first. The alignment calculator on the QO-100 page gives you azimuth, elevation and LNB rotation for your location.
Network
The board connects to your router via Ethernet and gets its address via DHCP, as long as no fixed address is set in Tezuka. Listening and operating work on your own network even without any internet. Updates, the clock and afu.tools need outgoing connections (https and NTP). You don't need port forwarding on your router, and you shouldn't set it up either: the gateway's control page doesn't belong on the internet; when you're away, you operate via afu.tools.
Computer and browser
For setup, a computer with ssh and scp. Linux and macOS have both, as do Windows 10 and 11 (Command Prompt or PowerShell). For listening, an up-to-date browser such as Firefox, Chrome or Edge, ideally with headphones.
Download and install the gateway
Download the program, verify it and store it permanently on the board.
1. Find the board and log in
Switch on the board and wait about a minute. It shows up in your router's device list with a new address. Ideally, reserve that address for the board right there, so it stays the same after every restart. In the commands below, 192.168.1.50 stands for that address. Put yours in its place.
ssh root@192.168.1.50
Tezuka's factory password is analog. The first time, ssh asks whether you trust the device: confirm with yes.
Tezuka v0.3.12 generates the board's SSH key afresh at every boot. After a restart ssh therefore warns that the key has changed. That's normal here. Delete the old entry with ssh-keygen -R 192.168.1.50 and log in again. From Tezuka v0.3.24 the key stays the same; the warning then only appears once after the Tezuka update.
It worked if the board's prompt appears; it ends in #.
2. Download and verify the program
The easiest way is to let the board fetch the program itself. Enter in the SSH session:
cd /tmp
wget -O qo100-gw-armv7 https://afu.tools/downloads/qo100-gw-armv7
wget -O qo100-gw-SHA256SUMS https://afu.tools/downloads/qo100-gw-SHA256SUMS
sha256sum qo100-gw-armv7
grep qo100-gw-armv7 qo100-gw-SHA256SUMS
The last two commands each print a line with a long number. Both numbers must be identical. If they differ, the file got corrupted on the way. Then enter the two wget lines again; they overwrite the old files.
If wget reports an error, for example about the certificate or "bad address", the board has no outside connection or its clock isn't set yet. In that case fetch the two files on your computer. Open https://afu.tools/downloads/qo100-gw-armv7 and https://afu.tools/downloads/qo100-gw-SHA256SUMS in the browser and save them. If the browser warns about an unknown file, confirm that you want to keep it. Then open a second window on your computer (Terminal, or Command Prompt on Windows), change to the download folder and copy both files to the board:
cd Downloads
scp qo100-gw-armv7 qo100-gw-SHA256SUMS root@192.168.1.50:/tmp/
On Windows, the first line in Command Prompt is cd %USERPROFILE%\Downloads.
Then compare in the SSH session with cd /tmp and the last two lines from above (sha256sum and grep).
Verify the signature (optional)
The checksums are signed with the same key as the gateway updates. If you have OpenSSL 3 on your computer (usually present on Linux; the openssl on macOS can't do it), you can check that the file qo100-gw-SHA256SUMS comes from us. To do so, download https://afu.tools/downloads/qo100-gw-SHA256SUMS.sig into the same folder and save the public key as a text file qo100-gw-signing.pem (without a .txt added on the end):
-----BEGIN PUBLIC KEY-----
MCowBQYDK2VwAyEAvSNCOEU+mZ5y3p3XNmhKIEa/Nc825vWbVG3SnEpEU1c=
-----END PUBLIC KEY-----
openssl pkeyutl -verify -pubin -inkey qo100-gw-signing.pem -rawin -in qo100-gw-SHA256SUMS -sigfile qo100-gw-SHA256SUMS.sig
The answer must be Signature Verified Successfully. Then compare the number from the file with the one sha256sum prints on the board.
3. Test run
chmod +x /tmp/qo100-gw-armv7
/tmp/qo100-gw-armv7 --version
/tmp/qo100-gw-armv7
Without further arguments, the program only shows what it finds on the board: kernel, processor, number of cores and the devices of the radio chip. It doesn't change anything and doesn't transmit.
It worked if a version number appears followed by an overview of the board in which "iio" lists, among other things, ad9361-phy. If you get an error such as "not found" or "Exec format error" instead, the file is incomplete or the board isn't a LibreSDR.
Autostart
Have the gateway start by itself every time the board powers up.
The program does the setup itself:
/tmp/qo100-gw-armv7 install
It asks for a password for the gateway's admin page (at least 8 characters, enter it twice). It then creates the program, configuration and start script and starts the gateway. The output names each step:
- "Programm:" tells you where the program is. The board's permanent storage (
/mnt/jffs2) is tight at under 1 MB. If it's not enough,installputs the program on the SD card under/boot/qo100and says so. - "Konfiguration:" is
/mnt/jffs2/qo100/qo100-gw.toml. It always stays in permanent storage. - "Autostart:" means that
/mnt/jffs2/autorun.shcontains a block between# qo100-gw beginand# qo100-gw end. Tezuka runs this file at every boot. If you already had lines of your own there, they're kept, and the old version is also saved alongside asautorun.sh.bak-with a date.
At boot the block also hard-disables the board's transmitter before the gateway runs. You can repeat install at any time, for example after a firmware change. Configuration and password are kept.
Admin page
Open http://192.168.1.50:8074/ in the browser. The browser asks for a username and password: the name doesn't matter, the password is the one you just set. The page shows status, update, pairing with afu.tools, beacon lock and the gateway log.
To test it, restart the board:
reboot
It worked if the admin page is reachable again after one or two minutes and "Läuft seit" (running since) under "Status" shows a short time.
The gateway isn't receiving your antenna yet, but a built-in test transponder. You only need the Pairing section for operating while you're away; carry straight on with Configure converter and LNB.
Calling the program again later
The file in /tmp is gone after a restart. You'll find the installed program with this line, which you enter once after each new SSH login:
P=$(sed -n "s/^P='\(.*\)'$/\1/p" /mnt/jffs2/qo100/start.sh)
echo "$P"
The second line shows the path to the program, for example /mnt/jffs2/qo100/qo100-gw or /boot/qo100/qo100-gw. If it's empty, the gateway isn't installed. After that you have "$P" stop (reports "qo100-gw gestoppt"), "$P" start (reports "qo100-gw gestartet" and keeps running in the background) and "$P" install. Instead of stop and start, a reboot always does the job too.
Good to know
Tezuka keeps running alongside the gateway, including its web interface on port 80. Don't use other SDR programs that connect to the board over the network (via ip:) at the same time. They change frequency and gain or occupy the receiver; the gateway reports this in the log.
A Tezuka update via the SD card leaves /mnt/jffs2 alone, so configuration and autostart remain. The program itself usually lives on the card (/boot/qo100), so don't format it during the update. How to do it is under Updating Tezuka.
If you don't want the gateway to start at the next boot, create an empty file: touch /mnt/jffs2/qo100/DISABLE. With rm /mnt/jffs2/qo100/DISABLE and "$P" start it runs again.
Pair with afu.tools
Link the station to your account so you can find it on the control page.
Once paired, the gateway itself sets up an encrypted connection to afu.tools (port 443 outgoing, like a browser). You don't need port forwarding on your router or a VPN, and you'll find your station on the control page from anywhere as soon as you're signed in.
1. Create the station on afu.tools
Sign in to afu.tools and open My QO-100 stations. Under "Create station" give it a name, such as its location. The page then shows you the station key once; it starts with aqo_. afu.tools only stores a checksum of it and can't show it again later. If you lose it, simply generate a new one.
2. Give the key to the gateway
The most convenient way is to enter your board's address below the key (for example 192.168.1.50) and click "Open at the gateway". The gateway's admin page opens with the key already in the field under "afu.tools". Sign in if it asks and click "Koppeln" (pair). Nothing is saved until that click.
If that doesn't work, for example because you're on a phone, copy the key, open the admin page http://192.168.1.50:8074/ yourself and paste it under "afu.tools". The key then lives only on the board, in /mnt/jffs2/qo100.
3. Check
After a few seconds the admin page shows "verbunden" (connected) under "afu.tools". If it says "Uhr nicht gestellt" (clock not set), the board doesn't have the time from the network yet, and without it no secure connection can be made. "abgelehnt" (rejected) means the key is wrong (mistyped or renewed in the meantime).
Then open the control page. It shows your station and, after "▶ Audio", spectrum, waterfall and audio, even over the mobile network.
It worked if the admin page shows "verbunden", your station is "online" under My QO-100 stations and the control page shows the waterfall from outside your home network.
Let others listen in
Under My QO-100 stations you can share your station with other accounts, "listen only" or "transmit" per callsign. Someone who only listens can tune and listen; a transmit command from them never reaches the gateway, because afu.tools filters it out beforehand. Transmitting only arrives once the gateway ships it, and then only after you enable it at the gateway itself. If you withdraw or change a share, afu.tools disconnects the person straight away.
Renew key or unpair
"New key" invalidates the old one and disconnects the gateway straight away; then give the new one to the gateway as above. If you no longer want to reach the station via afu.tools, click "Entkoppeln" (unpair) at the gateway and delete it here. Operating at home on the gateway carries on as described under First steps.
Configuration
LNB and beacon, so the frequency display is right.
Configure converter and LNB · Beacon lock and calibration
Configure converter and LNB
Switch the receiver to the antenna, LNB power and oscillator frequency.
Switch the receiver to the SDR
After installation the gateway receives a built-in, made-up transponder with a beacon and a few stations. That lets you try out the page without anything connected. For real reception, switch the source in the configuration to the SDR and restart the gateway. In the SSH session:
sed -i 's/^source = "synth"/source = "iio"/' /mnt/jffs2/qo100/qo100-gw.toml
grep '^source' /mnt/jffs2/qo100/qo100-gw.toml
P=$(sed -n "s/^P='\(.*\)'$/\1/p" /mnt/jffs2/qo100/start.sh)
"$P" stop
"$P" start
The second line must print source = "iio". If it still says "synth", open the file with vi /mnt/jffs2/qo100/qo100-gw.toml and change the line in the [rx] section by hand. The third line finds where the program is, the last two restart it. The gateway now configures the board's receiver itself (sample rate, receive frequency, filters) and hands it back in its previous state when it stops.
It worked if the admin page log has no line with "ERROR" and "IIO" and the state under "Bake und LNB-Kalibrierung" (beacon and LNB calibration) reads "Suche", "Fangen" or "Lock".
LNB power and polarisation
The LNB gets its voltage through the coax cable. The voltage also selects the polarisation: 13 V receives vertical, 18 V horizontal. The NB transponder comes down vertically, and the LNB rotation from the alignment calculator applies to that case. If your supply delivers a fixed 18 V, rotate the LNB by an extra 90° and then fine-tune for the strongest beacon. This guide assumes power is fed through a separate bias tee, as described under Requirements.
LNB oscillator
The gateway assumes an LNB with 9750 MHz and then tunes the receiver to 739.750 MHz. Most off-the-shelf LNBs and many modified for QO-100 work with 9750 MHz. If yours has a different oscillator, the value is in the data sheet or in the description of the modification. Enter this value on the admin page in the "Assistent LNB-Kalibrierung" (LNB calibration wizard) box at "Nominelle LNB-LO" (nominal LNB LO), in hertz, for example 9739000000 for 9739 MHz, and click "Start". The gateway retunes the receiver right away. The value is only saved permanently when you finish the wizard with "Speichern" (save), as described in the next section.
You don't need to know small deviations of the LNB. The gateway measures them on the beacon and takes them out. The setting "LNB oscillator for the IF display" on the control page also only changes which intermediate frequency is shown there, not the reception.
Beacon lock and calibration
How the gateway locks onto the beacon and tracks the offset.
In the middle of the NB transponder the BPSK beacon transmits on 10,489.750 MHz. The gateway looks for it, measures how far off your LNB is and shifts all receive paths by that amount. After that the displayed frequencies are right, even when the LNB drifts as it warms up. It searches up to about 270 kHz either side of the nominal frequency. If the beacon is further away, the LNB oscillator you entered is usually wrong (see LNB oscillator).
You can see the state on the admin page in the "Bake und LNB-Kalibrierung" box:
| Display | Meaning |
|---|---|
| Suche | The gateway is looking for the beacon in the transponder. It also checks whether the CW beacon is 250 kHz below and the upper beacon 250 kHz above, so it doesn't lock onto a different signal. |
| Fangen (acquiring) | Beacon found, fine measurement running. |
| Lock | Locked. The large number next to it is your LNB's offset; below it are the beacon's drift and signal-to-noise ratio. |
| Hold | The beacon has disappeared (rain, interference, alignment). The correction stays at the last good value. After 30 s without a beacon a new search starts around that value. |
On the control page the bar at the top shows the same thing more briefly: "BAKE ✓" means locked, "BAKE …" means the gateway is still searching.
It worked if "Lock" shows in green and the offset only drifts slowly. By the way, the test transponder has a beacon too, so it also shows "Lock".
LNB calibration wizard
If you don't know how far off your LNB is, or the beacon won't lock, start the wizard. It searches the whole receive window without prior knowledge, again about 270 kHz either side. If it finds several candidates it lists them, and you click "Das ist die Bake" (this is the beacon) next to the right one. It then waits until the offset has been steady for 60 s (under 1 Hz per second) and shows the result: the measured oscillator frequency of your LNB. With "Speichern" (save) the gateway takes it as the starting value for every further search.
Fine points
With "CW 10489,500" you switch to the lower CW beacon in case the BPSK beacon is ever missing. The measured offset is kept. "Nudge" shifts the correction in steps of 1, 10 or 100 Hz if you want to follow a different reference. "0" resets it. "Neu suchen" (search again) drops the lock and starts over. Under "Offset-Log" you can download the offset history as a CSV file; the gateway keeps the last 48 hours in memory.
Operating
Listen first, then transmit with permission, and the rules that apply.
First steps without transmitting · Permission to transmit · Controlling the power amplifier · Operating rules
First steps without transmitting
Listen, tune, check waterfall and audio.
Open the control page on the gateway
The gateway serves the control page itself, with everything it needs. Open in the browser
https://192.168.1.50:8443/app
The first time, the browser warns that the connection isn't secure. That's because of the certificate: the gateway issued it to itself, because there's no authority on your own network to vouch for it. The connection is still encrypted. Compare the fingerprint (SHA-256) in the details of the warning with the one on the admin page under "HTTPS-Zertifikat" (HTTPS certificate) and then confirm the exception (Chrome and Edge: "Advanced", "Continue to …"; Firefox: "Advanced", "Accept the risk"). The browser only asks once per computer.
The page then asks for a username and password: the name doesn't matter, the password is the admin page one. That makes you the owner of the station, and you can do everything.
The browser needs the secure connection for audio and microphone. The page also opens at http://192.168.1.50:8074/app, but then only shows spectrum and waterfall; the audio won't start.
Let others listen
For guests on your network who should only listen, set a second password:
"$P" passwd --hoeren
Anyone who signs in with it tunes their own receiver and listens, but can't operate anything on the station and can't reach the admin page. Switch it off with "$P" passwd --hoeren --aus. $P is the path to the program, see Calling the program again later.
If https doesn't work (another port in use, broken certificate), the reason is on the admin page under "Bedienseite" (control page). You get a new certificate by entering rm -r /mnt/jffs2/qo100/tls and restarting the gateway. As a fallback an SSH tunnel always works: ssh -L 8074:localhost:8074 root@192.168.1.50, leave the window open, then http://localhost:8074/app.
Via afu.tools, also when you're away
If the gateway is paired, it's simpler: open the control page, signed in to afu.tools, done. That works from anywhere, without a tunnel and without port forwarding, and the audio comes along too.
Listening
Click "▶ Audio" at the top. Browsers only play something after a click. The large overview shows the whole transponder (500 kHz) with the band plan above it; below is the zoom at 100, 50 or 15 kHz width. A click in the graph tunes there. The mouse wheel or arrow keys on the frequency display go one step further; choose the step size next to it. If you click on the frequency you can type it in, for example 10489,750 or just 750.
Phone on QO-100 is USB. Set USB under "Mode", find a trace in the SSB part of the band plan in the waterfall and click it. "Filter" changes the bandwidth, "AGC" is the automatic gain control (slow, fast, off), "NR" reduces noise in three levels, "Notch" removes an annoying whistle. On a phone everything is stacked: swiping across the waterfall tunes, two fingers zoom.
It worked if "BAKE ✓" shows at the top, the waterfall shows the beacon as a trace in the middle with changing signals around it, and you can clearly hear an SSB station with real traffic, callsigns and reports. That means your station is receiving. If you only hear uniform, speech-like sounds without intelligible words, the test transponder is still running (see Switch the receiver to the SDR).
Settings
Under "Settings" you adjust the waterfall (level, lines per second) and audio. If the audio stutters, choose a larger buffer under "Audio", for example 250 ms. "Diagnostics" shows the data rate the page currently needs.
Choose audio and microphone
Under "Settings" › "Audio" you choose the input device (microphone) and the output device, for example a USB headset. As long as the browser only shows "Input 1" or "Input 2" there, click "Show device names" and allow the microphone once. The browser remembers your choice. Safari and Firefox always play through the default device, but you can still choose the microphone there. The microphone only works over the secure connection (https://…:8443/app).
For voice transmission the microphone is part of it, once transmitting is enabled: in the "Transmit" tab, first "Microphone on", then "Enable transmitting", then hold PTT. Without the microphone switched on, the gateway won't key PTT, and the transmit panel tells you so. "Microphone on" on its own doesn't transmit anything. It sends your audio to the gateway, and with "Monitor (loop)" you hear in your headphones how it comes out of the transmit chain. You can also change the device in the "Microphone" box; a running microphone switches over without interruption.
Permission to transmit
What needs to be set up and confirmed before the first transmission.
To follow.
Controlling the power amplifier
Optional: an ESP32-C3 on the board switches the power amplifier and reports power, SWR and temperature.
The controller is called qo100-pa-ctrl. It's built for the 12 or 20 W DXpatrol power amplifier and runs on an ESP32-C3 Super Mini. The C3 plugs into the board's USB port via an OTG adapter. The gateway talks to it directly: it switches the amplifier on when transmitting and off again before releasing, and shows the readings under "Station". It only transmits once transmitting is enabled (Permission to transmit).
Parts
- ESP32-C3 Super Mini, USB OTG adapter for the board
- 4× 10 kΩ, 2× 1 kΩ, 1× 100 kΩ, 3× 100 nF, 1× NPN transistor (2N2222 or BC337)
- for a fan, additionally: 1× BC337, 1× 10 kΩ, 1× 1N4148
- for the relays, additionally: see Driver and amplifier via relays
Wiring
The amplifier has a six-wire ribbon cable for control and measurement:
| Wire | Function | at the C3 | in between |
|---|---|---|---|
| 1 | PTT | GPIO4 | NPN: GPIO4 via 1 kΩ to the base, 100 kΩ from base to ground, emitter to ground, collector to wire 1 |
| 2 | 5 V for the temperature sensor | 5V | direct |
| 3 | Temperature | GPIO3 | direct, 100 nF to ground |
| 4 | Reflected (SWR) | GPIO1 | divider 2× 10 kΩ, 100 nF to ground |
| 5 | Forward (power) | GPIO0 | divider 2× 10 kΩ, 100 nF to ground |
| 6 | Ground | GND | direct |
The 100 kΩ resistor at the base keeps the amplifier off while the C3 boots or is being flashed. Check the transistor pinout: emitter, base, collector on the 2N2222, exactly the other way round on the BC337. GPIO 2, 8 and 9 stay free; they determine how the C3 boots. Keep the leads short, there's 2.4 GHz right next to them.
A fan usually isn't needed if the amplifier sits on a solid enclosure wall. If it is: switch a 3-wire fan to ground via a BC337 (GPIO5 via 1 kΩ to the base, 10 kΩ from base to ground, 1N4148 across the fan), or connect a 4-pin PWM fan directly to GPIO5.
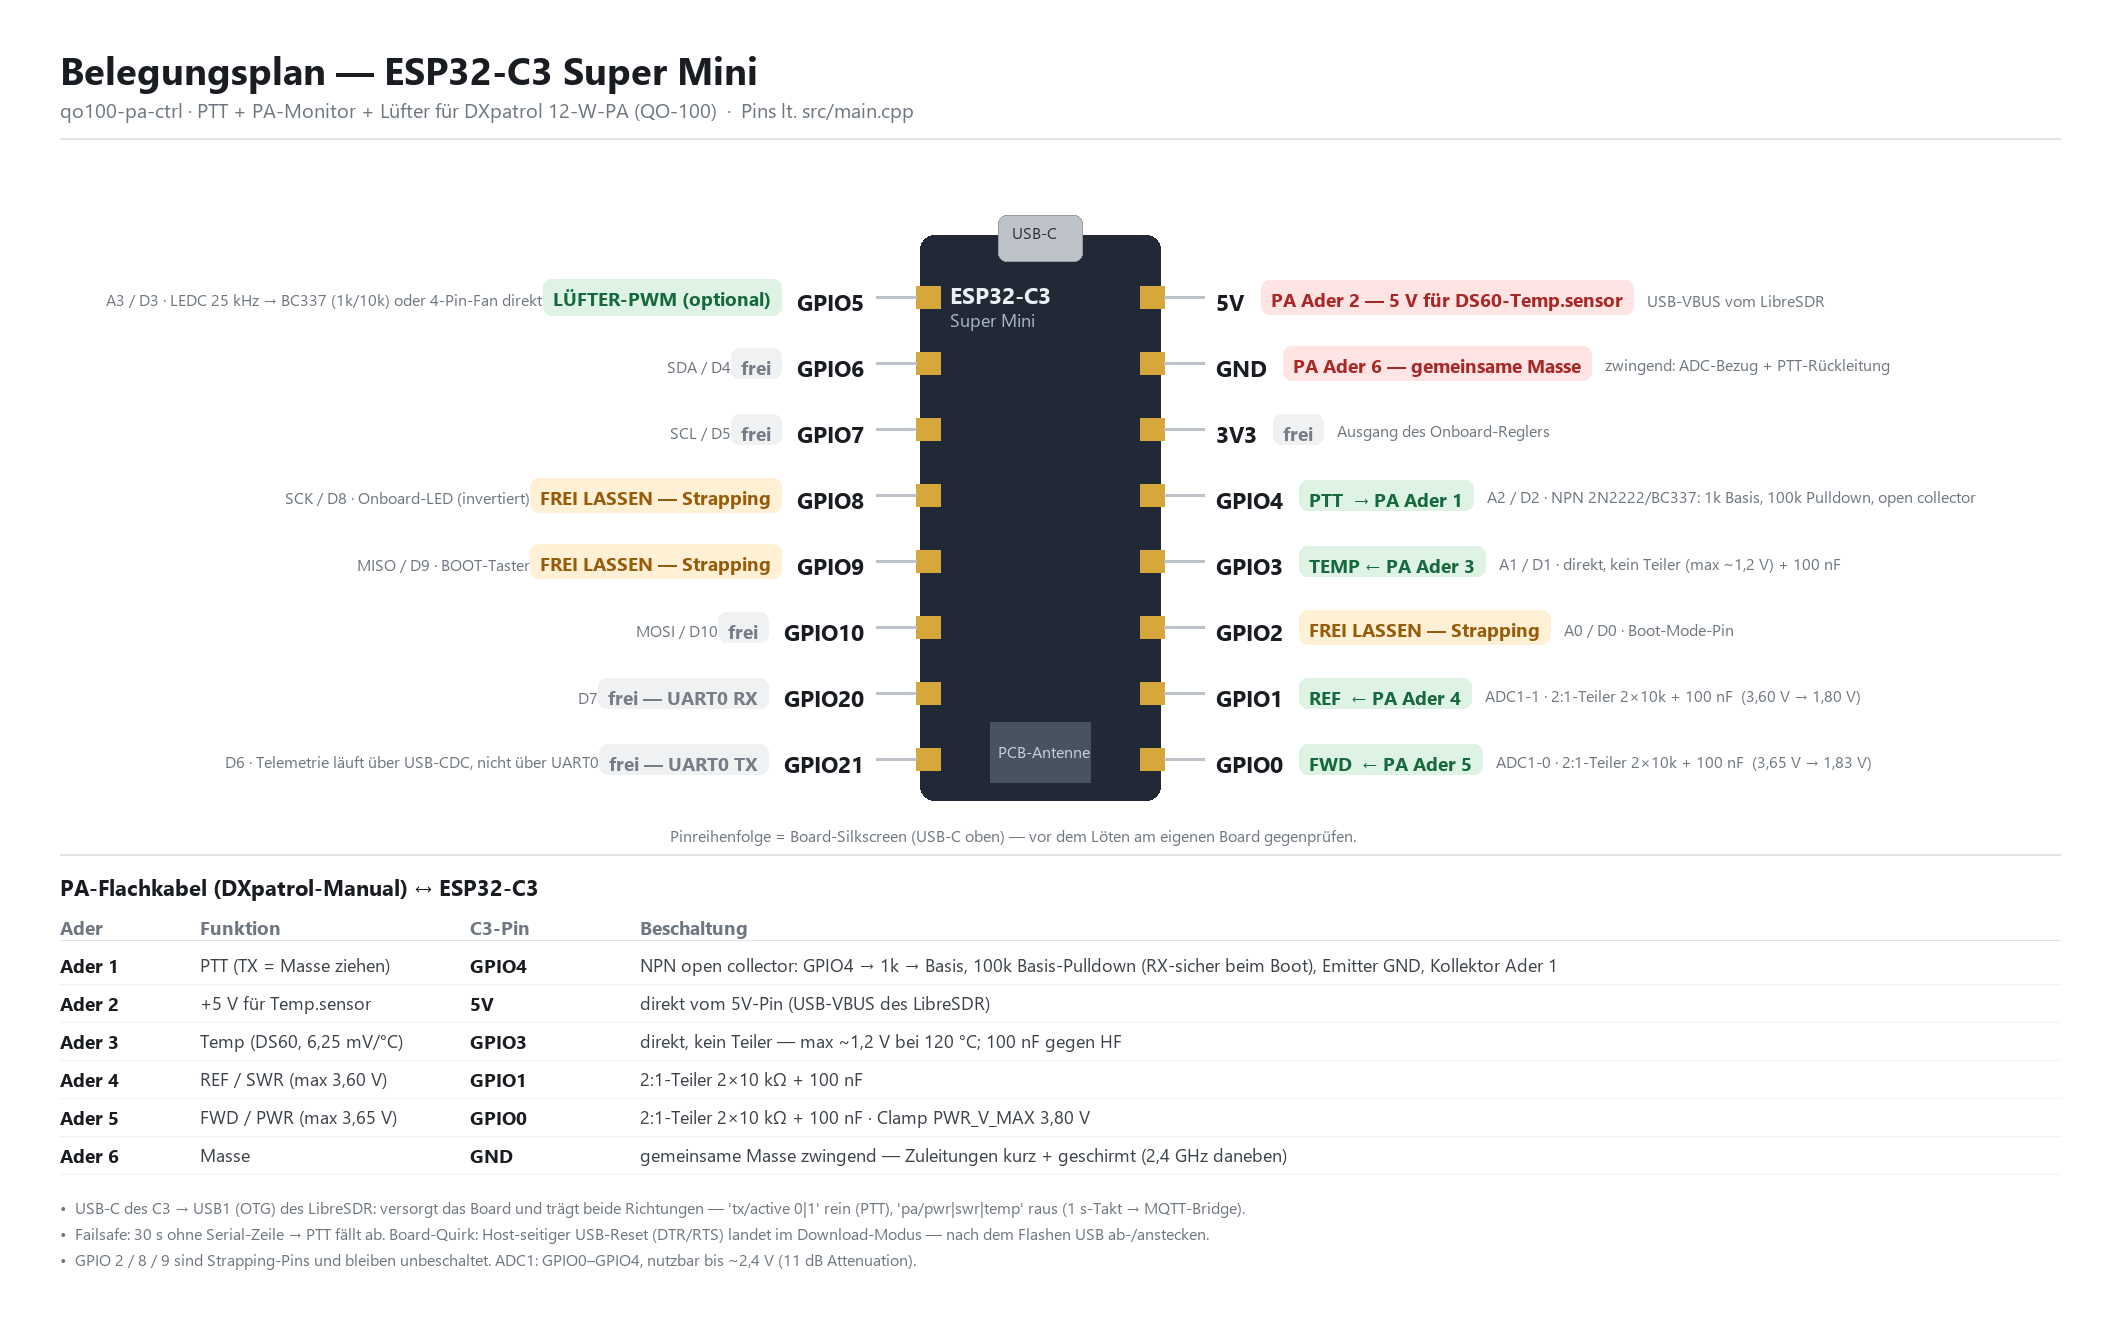
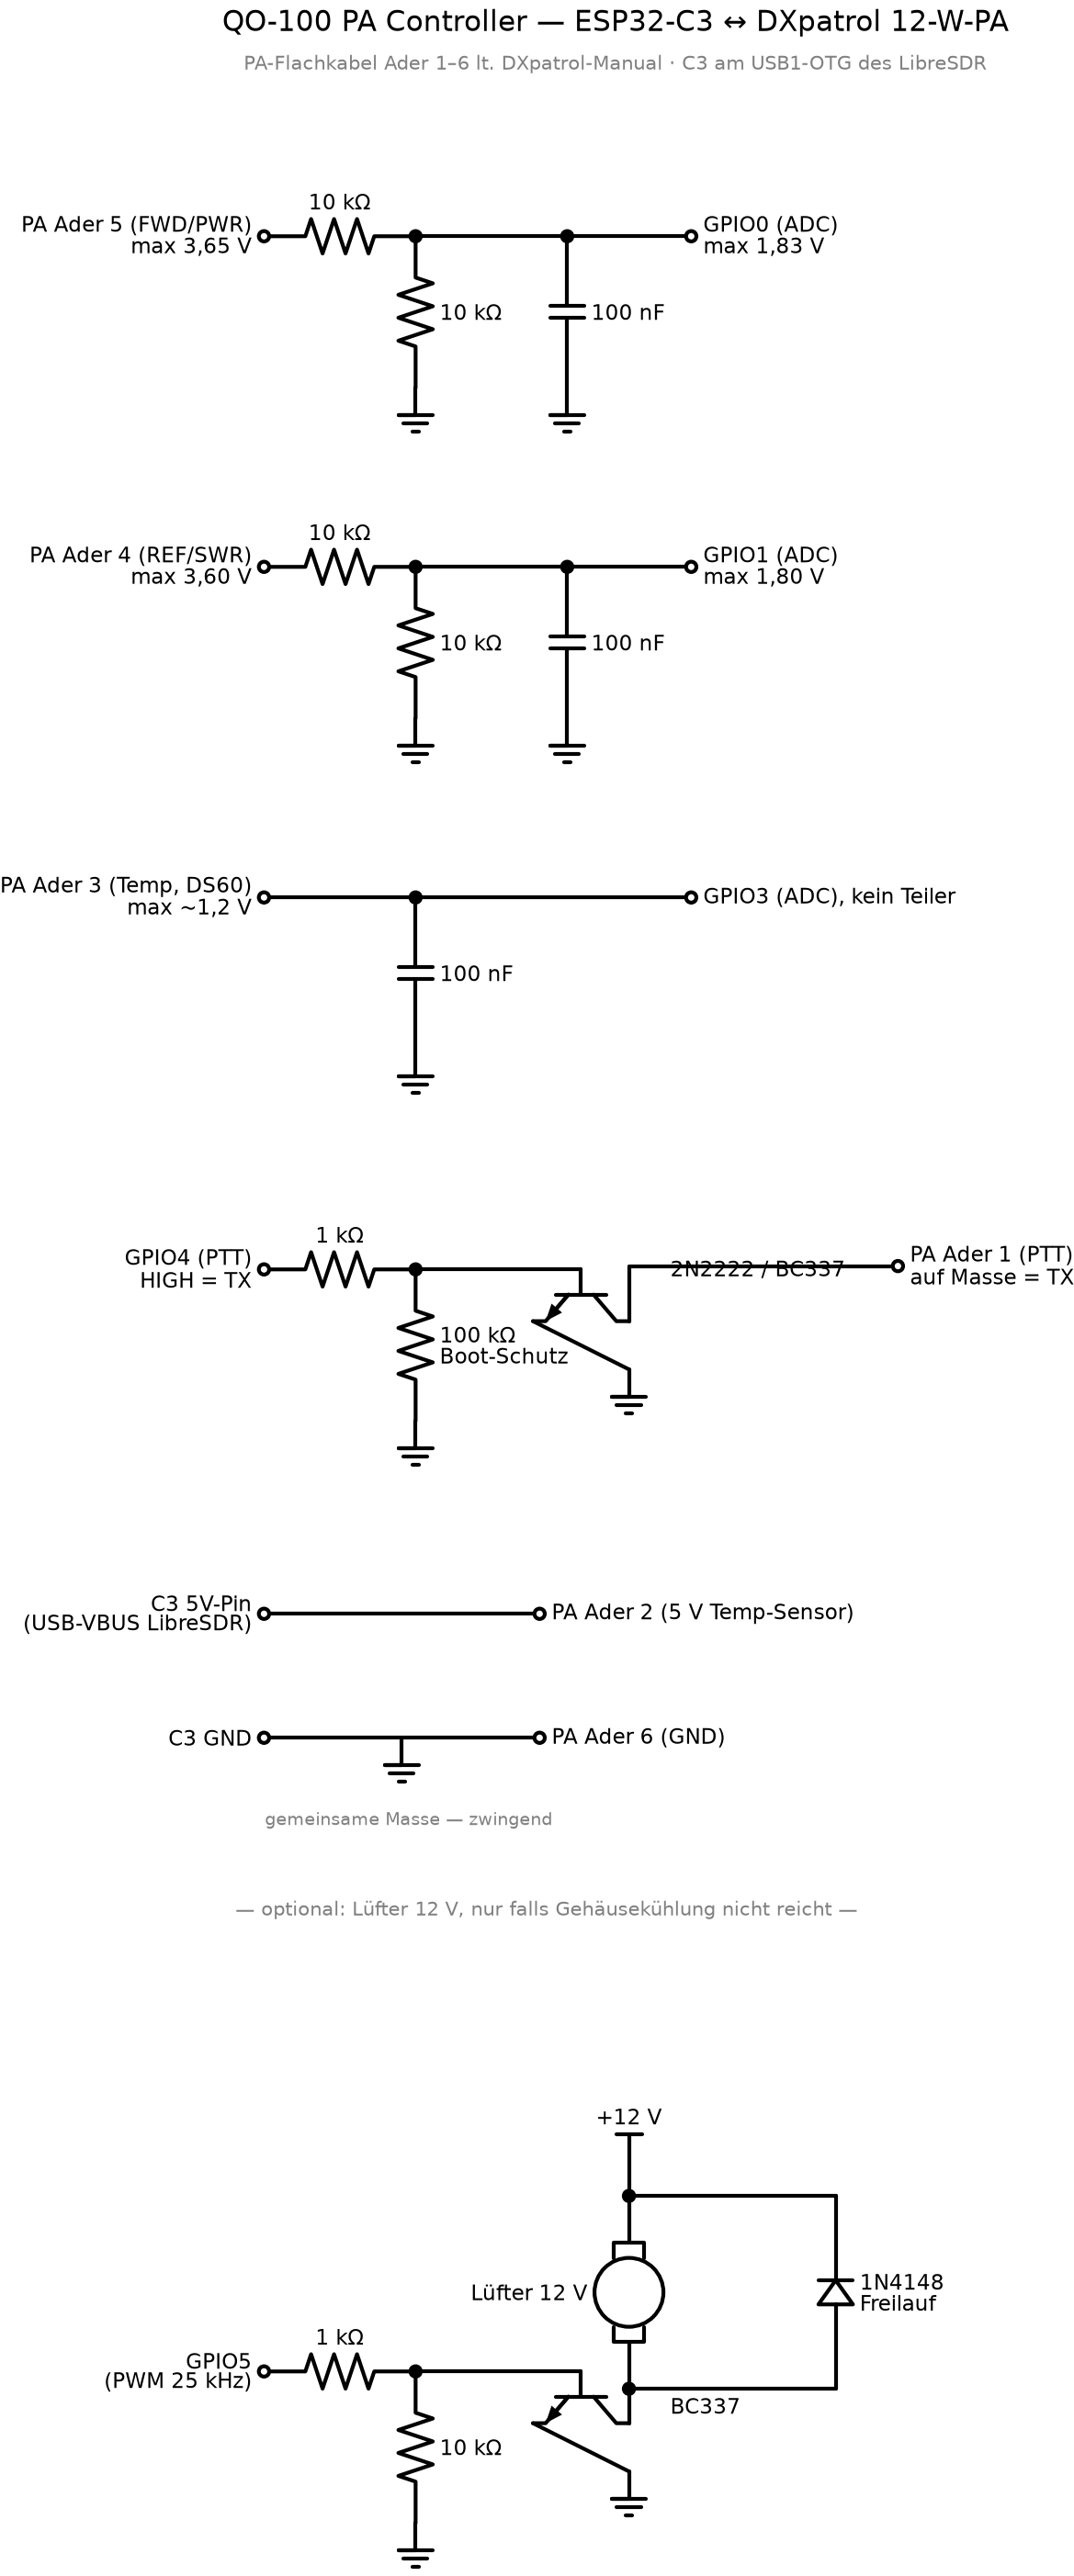
firmware/qo100-pa-ctrl/docs/kicad/.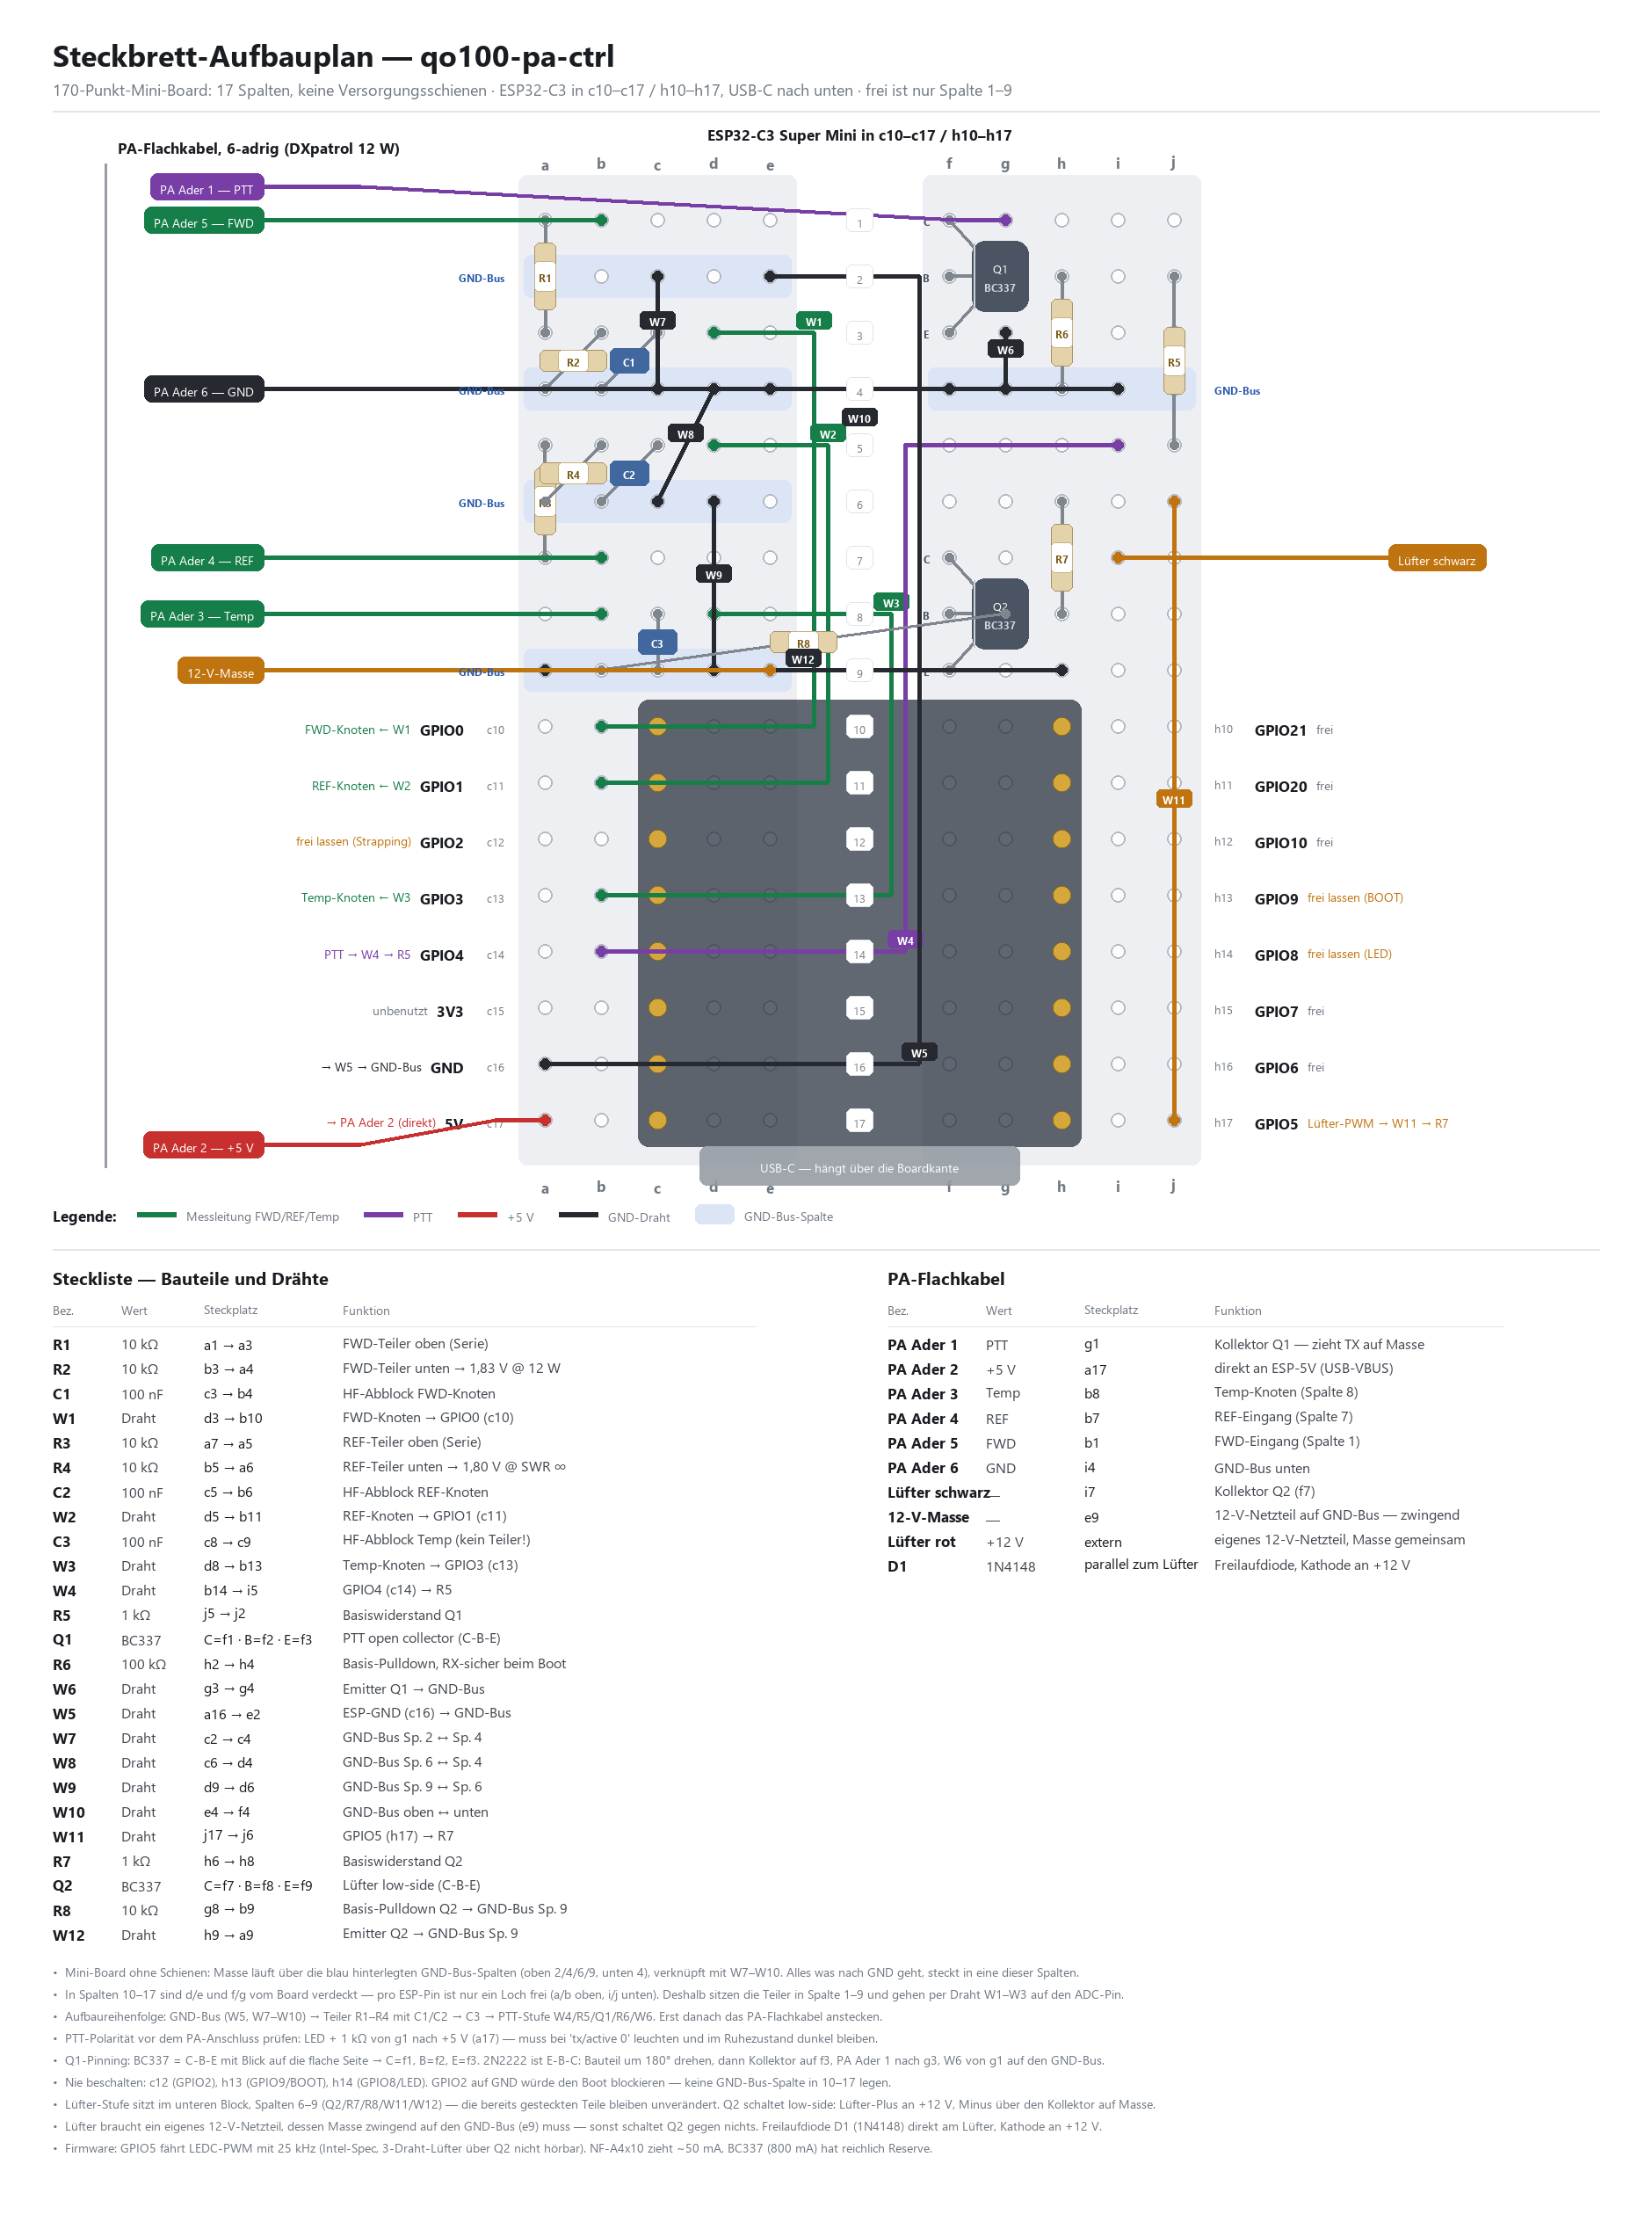
Flash the firmware
You can do this right here in the browser, with Chrome or Edge on a computer. Plug the C3 into the computer via USB for this, not into the board. Leave the amplifier disconnected. The page fetches the firmware from afu.tools, checks the checksum and writes it to the C3. It then reads what the C3 reports for five seconds. It doesn't send it anything, and PTT stays off.
Loading firmware …
After "Connect and flash" the browser asks which device to open. Choose the entry with "USB JTAG/serial debug unit" or "ESP32-C3". It worked if the box reports "Running: version …" and lines like pa/pwr 0.00 and pa/ptt 0 appear below. If nothing comes, briefly unplug and replug the C3 and use "Check only": some C3s stay stuck in download mode after flashing until they've been without power once.
Without Chrome or Edge, you can use esptool on your computer. Download the file https://afu.tools/downloads/qo100-pa-ctrl.bin and:
esptool.py --chip esp32c3 write_flash 0x0 qo100-pa-ctrl.bin
The checksum is in qo100-gw-SHA256SUMS, signed like the gateway (Verify the signature).
Connect to the board
Plug the C3 into the board via the OTG adapter. It shows up there as /dev/ttyACM0. Out of the box the gateway looks for the controller exactly there (mode = "serial" in the [pa] section). To see whether your configuration says something else, enter in the SSH session:
grep -A3 '^\[pa\]' /mnt/jffs2/qo100/qo100-gw.toml
If that prints nothing or shows mode = "serial", you're fine. If it says mode = "none", change the line with vi to mode = "serial". Then restart the gateway with "$P" stop and "$P" start (see Calling the program again later). The readings and the firmware version then appear under "Station".
At boot Tezuka starts a GPS service (gpsd) on /dev/ttyACM0. It would grab the C3. The gateway therefore stops it at every start as long as mode = "serial" is set. If a GPS receiver really is connected to that port instead of the controller, set stop_gpsd = false under [pa] and mode = "none".
If the C3 doesn't hear a switch-on signal from the gateway for three seconds, it switches the amplifier off by itself, for example if the gateway crashes or the cable comes loose.
Update the firmware on the board
From firmware 1.2.0 the gateway fetches new versions onto the C3 itself, and the C3 stays plugged into the board for this. Under "Station" the amplifier entry shows which version is running and which is in the release. If there's a newer one, "Update" appears. On the board's admin page there's the "PA-Firmware (ESP32-C3)" section for this, where you can also upload the files without internet. The gateway checks the signature as it does for its own update.
While the update runs, transmitting is blocked and the amplifier stays off. It only starts when nobody is transmitting and the amplifier is off. The new firmware must then report in. If it doesn't, the C3 falls back to the old one by itself after a minute.
Going from 1.1.0 to 1.2.0 goes once via the C3's bootloader: on the admin page under "Wiederherstellen (Bootloader)" (restore) or in the SSH session with "$P" ctl pafw install --rom. If the C3 doesn't report in afterwards, briefly unplug and replug it. The same route helps if a firmware won't start at all. "$P" ctl pafw shows the current state.
Driver and amplifier via relays (optional)
Two relays cut the power to the driver (DX-Patrol 1 W booster) and the amplifier while nobody is transmitting. From firmware 1.1.0 the C3 controls them via GPIO6 and GPIO7. After every gateway start both are off. You switch them on yourself, in the transmit panel with "Endstufe" (amplifier); PTT never switches them on. As long as the amplifier is off, the gateway blocks PTT ("PTT gesperrt: Endstufe aus") and only releases it once the PA has had power for half a second.
- 2× 1-channel 5 V relay module with optocoupler (e.g. GTIWUNG), jumper on HIGH, load on NO (normally open)
- 2× 10 kΩ, 1× 3-pin connector for the PA board, 1× 100 µF (at least 10 V), 1× 100 nF
- 3 to 4 A slow-blow fuse in the 12 V supply line, wires from 0.75 mm²; combined load at most about 25 W at 12 V
| From | To | in between |
|---|---|---|
| GPIO6 | J3 pin 1 → IN driver module | 10 kΩ from GPIO6 to ground |
| GPIO7 | J3 pin 2 → IN PA module | 10 kΩ from GPIO7 to ground |
| GND | J3 pin 3 | shared with the power supply ground |
| 5 V power supply + | DC+ of both modules | direct, not via the C3's 5V pin or USB; 100 µF and 100 nF at the modules |
| 5 V power supply − | DC− of both modules | direct |
| +12 V via fuse | COM of both modules | |
| NO | driver plus or PA plus |
Check the power supply: the 5 V supply also powers the board. Its rated current should be at least (peak demand of the LibreSDR + 0.4 A for the modules) × 1.2. Measure at DC+ of the modules while switching: at least 4.75 V. The board must not restart while doing so (uptime, dmesg, /dev/ttyACM0 stays, "Station" keeps showing values).
Test each module without load before fitting it: jumper on HIGH, NO and COM open; with 5 V on DC+/DC− and IN to ground it stays off; IN to 3.3 V pulls in (NO and COM connected); IN back to ground releases.
Then enable it in the [pa] section of the configuration and restart the gateway:
relays = true
relay_idle_min = 30        # Auto-Aus nach 30 min ohne Senden, 0 = nie
relay_off_on_leave = true  # aus, wenn die Station frei wird
You can switch in the transmit panel ("Endstufe ein"), on the admin page (where you can also switch driver and PA individually, for testing) and in the SSH session with "$P" ctl pa on, "$P" ctl pa off and "$P" ctl pa for the state. The C3 first switches on the driver and the PA 200 ms later; when switching off, first PTT is released, then the PA, then the driver. If it hears nothing from the gateway for 15 seconds, it switches both off.
Test without the amplifier first
Instead of wire 1, connect an LED with a series resistor to the transistor stage. Without transmit permission it stays off, and "Station" shows ptt 0. Do the first test with transmitting into a dummy load at the board's transmit output, not with the dish and the satellite.
Operating rules
AMSAT-DL guidelines: level below the beacon, band plan, remote operation only of your own station at your own location. A note on the BEMFV.
The AMSAT-DL band plan and operating guidelines apply to the NB transponder. The points that directly affect you with this station:
- Your signal in the downlink must not be stronger than the beacons. Keep it below beacon level.
- No transmissions wider than 2700 Hz, no FM.
- Stick to the band plan segments. The emergency frequency 10,489.860 MHz with its guard bands (10,489.858 to 10,489.865 MHz) stays clear. When and where contest operation is allowed is explained by AMSAT-DL under Contests on QO-100.
- Remote operation via QO-100 is only allowed if the station belongs to you and is at your own location. A station at someone else's location, for example at a local club, is not covered by the wording. Clear this with AMSAT-DL beforehand.
You can also see the band plan on the QO-100 page and as an overlay on the control page.
BEMFV
Under § 9 BEMFV (German EMF exposure regulations) you must notify the Bundesnetzagentur (BNetzA, German regulator) of a fixed amateur radio installation with 10 W EIRP or more before putting it into operation, and determine the safety distance. With the gain of a dish at 2.4 GHz, even an amplifier of a few watts is above that. The Bundesnetzagentur has forms and guidance on its page Anzeige Amateurfunk. This is a pointer, not legal advice; the text of the regulation is what counts.
Help
When something doesn't work, keeping the gateway up to date or removing it again.
Troubleshooting · Update and uninstalling
Troubleshooting
Common problems and what to do about them.
You'll find the gateway log at the bottom of the admin page. You can filter it there and download it as a file. In the SSH session, tail -n 50 /tmp/qo100-gw/gw.log shows the last lines.
| What you see | Cause and fix |
|---|---|
ssh warns that the device key has changed | Normal with Tezuka v0.3.12 after every board restart, from v0.3.24 only after a Tezuka update. ssh-keygen -R 192.168.1.50, then log in again. |
| Admin page not reachable | Check the address in the router. Is the gateway running? tail /tmp/qo100-gw/gw.log tells you. If the file /mnt/jffs2/qo100/DISABLE exists, delete it and start the gateway (see Calling the program again later). |
install reports "zu wenig Platz" (not enough space) | There wasn't enough space either in permanent storage or on the SD card. df -h /boot shows how much is free on the card; a few MB are needed. After tidying up, /tmp/qo100-gw-armv7 install --prog-dir /boot/qo100 explicitly puts the program on the card. |
| Admin page not reachable after a Tezuka update, log says "qo100-gw fehlt (SD-Karte neu formatiert?)" | The card was formatted and the program is gone. Download it again as under Download and run /tmp/qo100-gw-armv7 install. Configuration, password and pairing remain. |
| Admin page: "Tezuka … nicht geprüft, TX gesperrt", transmitting is refused | The card has a Tezuka version the gateway hasn't been tested with. Reception carries on. Either flash the tested version or approve this version with "Diese Tezuka-Version zulassen" (allow this Tezuka version) (see Updating Tezuka). |
| Spectrum shows clean signals that never change, even without a cable | That's still the built-in test transponder. Switch the source as under Switch the receiver to the SDR. |
| Log: "belegt, offen bei: … iiod" | Another SDR program is connected to the board over the network and is holding the receiver. Close that program, then restart the gateway with "$P" stop and "$P" start (see Calling the program again later) or restart the board. |
| Log: "Einstellung von außen verstellt" | Another program has changed frequency or gain. Close any other SDR software. |
| Only noise, the beacon stays on "Suche" | Check the LNB power (13 V for vertical; with 18 V rotate the LNB by 90°), the dish alignment and the cable at RX1. Is the LNB oscillator right? If not, start the wizard with the correct value. |
| Beacon often switches to "Hold" | The beacon is too weak: readjust the alignment; briefly normal when it rains. |
| No audio, message "Ton lässt sich nicht starten" | The page was opened without a secure connection. Open it via https://192.168.1.50:8443/app (see Open the control page on the gateway) or via the SSH tunnel and http://localhost:8074/app. |
| No audio, but no message either | Click "▶ Audio", check volume and output device under "Settings" › "Audio". |
| Audio stutters | Choose a larger buffer under "Settings" › "Audio". Fewer waterfall lines per second save data rate. |
| The signal display has a red border, and the tooltip says the input is overloaded | Too much signal at the SDR. By default the gateway uses the gain Tezuka has set. You set a fixed gain in dB (allowed −10 to 77) with sed -i '/^\[rx\]/a gain = 30' /mnt/jffs2/qo100/qo100-gw.toml, check with grep gain /mnt/jffs2/qo100/qo100-gw.toml and restart the gateway. If it's too quiet afterwards, use a higher value: change the line in the file with vi, don't append it a second time. |
Update and uninstalling
Keep the gateway up to date or take it off the board again.
Update
The gateway checks for a new version after starting and every hour after that. It only installs at the press of a button: on the admin page under "Update" with "Installieren" (install); "Jetzt prüfen" (check now) asks straight away. Without internet on the board, download the file ending in .upd from https://afu.tools/downloads/ and install it via "Paket hochladen" (upload package).
Every package is signed; the gateway won't accept a foreign or damaged one. If the new version doesn't start cleanly, it goes back to the previous one by itself. The admin page reloads after the update.
Updating Tezuka
Tezuka has no button that updates itself. From v0.3.24 the dashboard only shows under "Update" whether there's a newer version and links to the releases. Which version is currently running is shown on the gateway's admin page under "Status" at "Tezuka".
The gateway has been tested with Tezuka v0.3.12. With another version it receives as usual and can be operated, but only transmits once you approve that version on the admin page with "Diese Tezuka-Version zulassen". The approval only applies to exactly that version; a later Tezuka update blocks transmitting again. You can also withdraw it there.
- Back up the card first, ideally as an image, but at least the
qo100folder on it. - Download the ZIP
tezuka-libre-…of the new version and copy the contents of thesdimgfolder onto the card, overwriting existing files. Don't format the card and leave theqo100folder alone: that's where the gateway lives. - Insert the card, start the board, check in the SSH session:
P=$(sed -n "s/^P='\(.*\)'$/\1/p" /mnt/jffs2/qo100/start.sh)
"$P" tezuka check
Each line starts with OK, WARN or FEHLER, and the result is at the end. The check doesn't transmit or change anything. WARN at "Tezuka-Version" means: not tested, transmitting blocked until approved. If the shell reports "not found" for "$P", the program is gone because the card was formatted after all. Then download it again into /tmp as under Download and run /tmp/qo100-gw-armv7 install. Configuration, password and pairing with afu.tools remain; it won't ask for a new password.
Going back to the old version works the same way: flash the old Tezuka version the same way, or write back the backed-up image.
It worked if tezuka check ends with "Ergebnis: OK" or "Ergebnis: WARN" and the admin page is reachable again.
Uninstalling
In the SSH session:
P=$(sed -n "s/^P='\(.*\)'$/\1/p" /mnt/jffs2/qo100/start.sh)
"$P" uninstall
After the confirmation prompt, which you answer with ja, the program stops the gateway, removes its block from /mnt/jffs2/autorun.sh (your own lines stay, a backup sits alongside) and deletes program, configuration and /mnt/jffs2/qo100. Restart the board afterwards, and it runs exactly as with Tezuka alone.
It worked if the output ends with "qo100-gw entfernt." and the admin page no longer responds after the restart.